Designing your restaurant (and its cuisine) is the fun part of the process. You can expect to meet in person with your architect about four times from conception of your restaurant design, to final inspection for check-ins. But don’t forget for a minute about the aforementioned governmental bodies—these four gatekeepers stand between you and opening night. Never Fear. We’re here to break down all the hoops you’ll jump through to earn their favor.
In 1765, Monsieur Boulanger opened the Western World’s first restaurant in the old city of Paris, and we’re guessing he didn’t have to file nearly as much paperwork as you will in Chicago in 2014. His opening process was quicker than yours will be but the safeguards he probably didn’t consider contributed to the equally quick life span of his contemporaries, cut short by foodborne illness, fires and floods, among other curveballs of life in the 18th century.
Thankfully, we now have the Department of Buildings to protect us from fires and the Department of Health to ensure our cuisine will only delight our senses—not snuff them out. The Business Affairs and Consumer Protection issues Retail Food Establishment and liquor licenses after passing their inspections with flying colors. And The Department of Zoning is the authority on whether you can even break ground on a location in the first place.
Step 1: Get in the Zone: Ensure your site is zoned for Restaurant use

In ancient fiefdoms, if the monarchy disapproved of what you did with your land, you were beheaded (and your sheep repossessed by armed guards). Now we can prevent such casualties by consulting the Chicago Zoning Ordinance—which dictates what type of business/residence can go where—prior to signing a lease or purchasing property. Be thorough in your investigations, advises Matt Nardella, lead architect of the team here at moss: “the most common holdup in [acquiring] permits is usually with Zoning for underlying issues with the building that often have nothing to do with the [your] project.” And you really don’t want to be paying rent on a space you can’t even open.
Use this interactive zoning map to plug in an address or intersection to find its zone. Your architect can confirm the map’s findings, in case it isn’t up to date.
Food service establishments, bars, and the gray area between (Cheesie’s, anyone?) are all Zone (B) or (C), which are further broken down into B1, B2 and B3 and ditto for C’s. Further down the rabbit hole, there are three major types of food/drink businesses: Restaurant Limited (food only), Restaurant General (food and drink) and Tavern (drinks; no food). Once you have checked your site’s zone against the CZO, you’ll be able to see if your desired business type is permitted in your potential location. See why it’s not a good idea to jump into lease negotiations first?
If your vodka-fountain-salad-bar gastropub isn’t in the cards, you can find another spot, stick to your guns with a Zoning hearing, or try and get your alderman to sponsor the change.
Step 2: Crack the Code: make sure your Restaurant is compliant with current CBC
Once you feel confident that your site has the green light, confirm on the DOB database that it has no outstanding building violations from previous tenants that might delay approval. It must be “up to date on all right-of-way, driveway, and use permits,” says Nardella.
Building Code is a series of requirements for structural soundness and safety of buildings, designed to protect the occupants inside. It has criteria for number of exits needed per person and construction materials (outside-leading stairwells must always be non-flammable!). It also stipulates requirements for accessibility, which we advise triple-checking. These can include ramps; doorway width; and turning radii for wheelchair users. “Non-accessible entries and restrooms are among the most common code issues I see,” says Nardella.
Restaurants, bars and taverns are a Class F “Mercantile Unit”, as long as their occupancy doesn’t exceed 100 persons. (Above 100 occupants is a Class C “Assembly Unit”, which the code considers more ‘hazardous’ because of the higher density).
Insufficient cooling capacity and electrical load (aka shrimpy HVAC units unable to keep a working kitchen cool) can also pose potential inspection pitfalls. To avoid demerits, make sure operation panels and utility meters are installed somewhere easy to read and adjust, i.e. not in bathrooms or sandwiched behind appliances.
A comprehensive DOB inspection checklist is available (page 17) but it is non-exhaustive and will still need to be checked against current building code. Your architect will go through it with you to ensure everything is in order before submittal.
You also need to comply with the Department of Health, who will scan for number of functional hand sinks (bars require one separate from BOH), refrigeration temperature, floor and sink drainage, operability of current equipment, cleanliness of exhaust filters, etc. CPDH provides both a health department inspection checklist (page 21), and a Food Plan Establishment Review Form.
Special Case: LIQUOR LICENSE
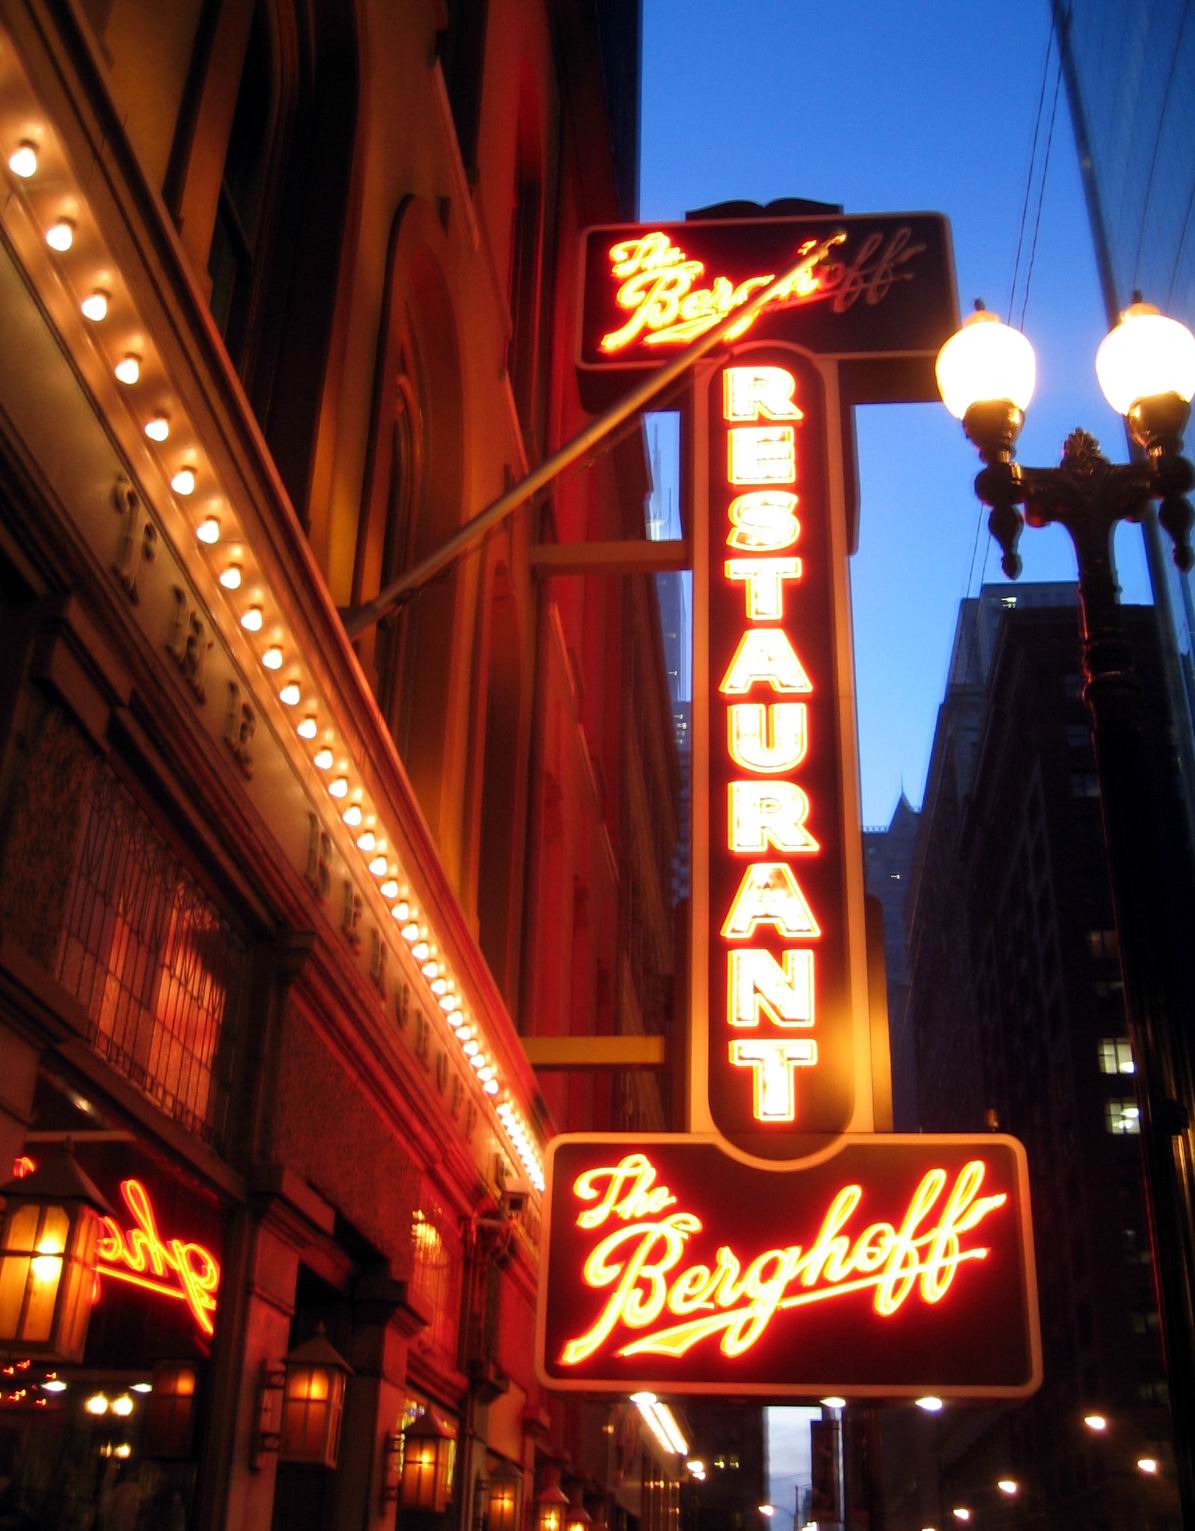 Chicago Institution The Berghoff was the first recipient of a liquor license after Prohibition ended
Applying for any of the six types of Liquor Licenses or a Public Place of Amusement License (necessary if you wish to host live entertainment), will add a little more work to your plate, but having been through the ringer several times before, your architect will know the process like the back of her hand. Watch out for designated “dry precincts” in the city, where the residents have voted to ban alcohol sales, and verify that your restaurant design (if you plan to serve liquor) steers clear.
Dry precinct or not, a buffer zone is required between businesses that serve alcohol or host live entertainment; and certain public services, such as schools, hospitals churches and elderly care homes. For places with a Liquor License, the minimum is 100 feet; for businesses holding a PPA, the minimum increases to 200 feet.
To double check your site is up to code and meets requirements, you can call in a BACP consultant to approve your site for $250, which will be credited towards your licensing fee.
Step 3: Settle in to Stay: Negotiate Your Lease
Now that you know it isn’t concealing any nasty surprises, you’d like to ink a deal on your new space. Not so fast. You’ll need to negotiate in order to preserve your profit line from delays in lease agreement and construction. Three methods give you a chance to catch up financially:
1. Rent Abatement: You won’t pay rent until a milestone is hit (such as opening night, three months into operations, etc.)
2: Allowance: Your landlord will agree on a certain amount of money to improve the space, which could be arbitrary, or could have some basis in how much work you are doing.
3: Concessions: Your landlord will do some work to a point, until they turn it over to the tenant, who then funds and finishes renovations.
Your argument is that by moving a profitable business into their space, their property value is likely to rise, and they also gain a long term tenant. But to prepare for the worst (you going under), we recommend not signing a lease for too many years in advance at the outset.
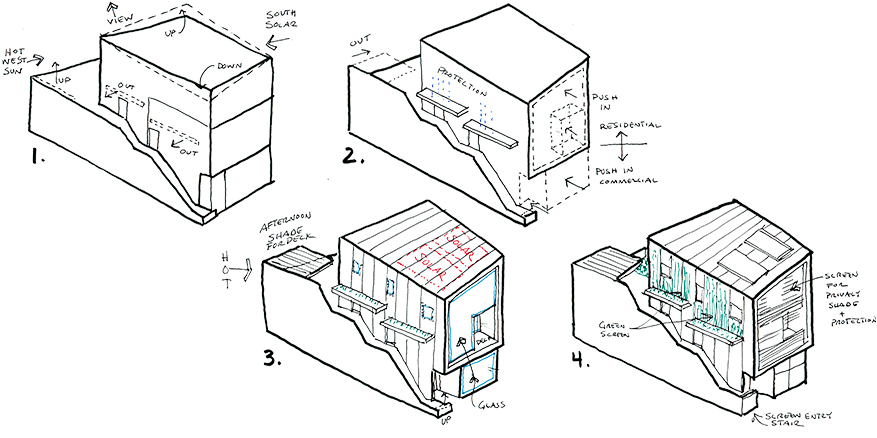
Step 4: Get Cooking (metaphorically): Designing your Kitchen
Now that you know where your restaurant will be and what the existing space looks like you can dig in with your architect to begin the fun part! Designing the kitchen space of your dreams.
EQUIPMENT
One of the biggest jobs on the roster will be ordering and installing the appliances that will populate your kitchen. As the backbone of your operation, refrigeration, ventilation and cooking equipment will be your biggest investments. If you inherited some of this gear, it might slash your bill, but if you are starting from scratch expect to drop $25,000 or more for these products. Opportunities may arise to purchase used equipment, but we recommend steering clear of second hand refrigeration. “It’s not worth the savings,” Nardella says. “It’s typically not energy efficient and has a higher chance of breaking down.”
Think hard about what you’ll want. “The only way to know what type of equipment you need is to develop your menu,” Nardella says. “Once you know what you want to cook, an architect or kitchen supplier can evaluate cooking, refrigeration and storage needs.”
Increase energy efficiency in your kitchen by seeking out energy star certified appliances, and weighing the costs of gas vs. electric (gas heats up faster, saving time and radiant heat, while electric is cleaner—unless it’s powered by coal, that is.) When it comes to refrigeration, which will eat up around 13–18% of your energy budget, your designer can help find units that use HCFCs in their compressors, which, unlike CFCs, break down in the troposphere before depleting the ozone layer. The compressor should ideally lead outside so that additional heat is not being pumped back into the kitchen.
VENTILATION
“A restaurant will always demand cooling more than anything else because of all the residual heat from the cooking equipment,” advises Nardella. “The best way to alleviate this is to allow the kitchen to be naturally ventilated as much as possible.” That means windows, and as many as you can muster. Though, “It’s common to bury [kitchens] in the least desirable areas of the building, natural ventilation can help to cool the kitchen space and may eliminate the need for a make-up air unit, saving some serious dollars better spent elsewhere.”
Your kitchen hood will be outfitted with extractor fans that pass smoke and carcinogenic pollutants from burnt food through a carbon filter, and then funnel them outside. At the same time, fresh air, or “make up air,” will be drawn in at an equal rate to maintain interior air pressure and temperature. The exhaust hood duct needs to be routed to the outside, somewhere that is not near other intake louvers or operable windows and, in most cases, this location will be the roof. Routing the duct from the kitchen all the way to the roof can be one of the most fiscally and physically challenging aspects of converting a space that lacked the previous infrastructure of a restaurant. It may require rewiring and plumbing adjustments, as well as possible tearing into and building of new walls.
FIRE SAFETY
A sprinkler system may need to be installed (required for Type 1 hoods) with proper access to water to adequately put out a fire. A fire suppression system will need to be functional and unblocked, especially in the event of a grease fire or electrical fire, which cannot be extinguished with water. Class K fire extinguishers are equipped to put out this type of fire, so make sure to keep one handy. Bars, clubs and live entertainment venues can get extremely packed, so it’s essential that pathways to exits are never obstructed and exits are illuminated and clearly marked.

STORAGE
Shelving to store dry goods, utensils and spices will be helpful in keeping your space as organized as possible (essential during a lunch or dinner rush). These should be easy to clean, and open so as to be able to quickly scan for a needed item. These should ideally be positioned somewhere close to ranges and prep tables so cooks can access them easily.
CLEANING
What your grease trap lacks in glamour it makes up for with commitment to keeping your pipes clear and your kitchen safe from fires. To be at its fighting best, make sure to clean it before collected cooking fat from sinks and woks builds up to hazardous levels. Industry standards say this means emptying it when grease accumulates to about 25% of the traps capacity. You will also need a three compartment sink to get dishes clean and back in circulation as quickly as possible. The compartments will comprise soaking, rinsing and sanitation water, which will kill germs before they are put on the drying rack.
WASTE DISPOSAL
Despite best efforts, you’re likely to find your volume of trash multiplying, so you’ll need a commercially licensed dumpster to keep up. To increase sustainability, keep paper and plastic disposable flatware to a minimum, and no styrofoam, please! Linens are generally better for the earth, especially if you have an energy efficient washer/dryer. For to-go items, look into biodegradable packaging (we’ll air our issues with corn in another post).
Step 5: Wrap yourself in Red Tape: Apply for building permits with the DOB
The DOB conducts inspections and issues the building permits you’ll need to execute your restaurant design. A building permit is required for any renovation, addition or new building, which includes plumbing, electrical, HVAC (heating, ventilation, air conditioning), drywall, demolition and new walls. A complete list of alterations requiring a building permit are listed here.
To begin, your architect will provide you with your site plan, plat of survey, architectural plans and electrical/plumbing plans to submit to both the Zoning Department and the DOB. You’ve been brainstorming with them all along to figure out all the restaurant design issues involved in the process but this is the first time that their drawings will be needed for an external source. Make sure you’ve got your design all nailed down before applying for the permit because big changes made to the design after this point will start to get expensive in design time. The review process by the city is highly variable and can take anywhere from 1-4 months.
Submit to the Zoning Board first, and once they have approved your architectural plans and location, submit all your plans through e-plan (an electronic portal), for review by the DOB. In addition, you will need to send them your kitchen equipment specifications and proposed menu.
Don’t forget to square away any money you owe the city, as they will not process your application if you owe them $800 in old parking tickets.
Once all your plans have been approved, congratulations, your permits will be issued!
Step 6: Make it Official: Submit completed RFE application
All of this hard work has been moving towards your ultimate goal, (drum roll) to become a licensed Retail Food Establishment, or RFE. After you’ve secured your permits and approval from the DOB and the Zoning Board, you can go ahead and submit your RFE application to the BACP, either in person or online.
The application fees are listed below. They are definitely no small sum, so triple checking you are in compliance early will put you on the swiftest path to your RFE license, and make future inspections breezy.
| Sq. Foot of Establishment | Cost of Application (fees based on two year term) |
| 0 – 4,500 sqft | $660.00 |
| 4,501 – 10,000 sq. ft | $880.00 |
| 10,001+ sq. ft | $1,100.00 |
In addition to the application, you will need to provide your:
1.Business Information Sheet (BIS)
2. Chicago Sanitation Certificate
3. Copy of your lease or proof that you own your property
Also, begin your Liquor License application now, which will have to be carried out in person, and will require more in depth background checks of anyone with more than 5% ownership of the business. In addition to scheduling background checks, you will need to provide proof of your Liquor Liability insurance, and a BASSET (Beverage Alcohol Sellers and Servers Education and Training), and your application for occupancy signage, already approved by the Zoning Board.
If applying for the PPA license, begin that application now as well. Like the Liquor License, these can only be completed in person (we assume because they want to make sure you won’t be booking Justin Bieber).
If your site has anything that protrudes onto the public way (sidewalk, street, alley etc.), such as a bench, awning or canopy, begin the application for Public Way Use Permit at this time, too.
Step 7: Rubber Stamp it: Pass your Inspections

All of your building work must be completed before inspections—but once these are complete you are finally ready to feed your first customer. It’s a good idea to create cleaning and maintenance schedules as you prepare for these inspections to keep things in shipshape once you’re up and running.
If you are not applying for a Liquor License, sit tight: the CPDH should arrive within three business days to inspect your restaurant after you’ve submitted your final payment.
If you are applying for a Liquor License or additional licenses, you must schedule an inspection taskforce through the BACP, which will include a comprehensive visit from the BACP and Department of Fire, Buildings and Health. They will arrive within a three hour window on the big day.
If you fail, all is not lost: fix whatever was identified in your feedback and arrange a reinspection. Reference this list of common errors to avoid making an easy mistake.
And that’s a wrap! Whether you are going through a restaurant opening or considering it for the future, we trust that this has been a helpful guide. If you have questions, let us know in the comments below!