
The wood wall panel is a moss detail we created for the Uptown Family Vision optometrists office (just one of the array of reclaimed wood applications we showcased there). Now it’s about to be featured in a residential remodel project of ours. Today we’ll show you how we detail a wood panel wall.
Unlike some of our other Moss in Detail posts, this isn’t a design solution we get to use in every project as we wouldn’t want it to be overplayed. In some cases there are other wall surfaces – like original exposed brick – we want to showcase, in others we choose to feature some other aspect of the building than the walls. However, this is a detail we like a lot, and here’s why:
Why a wood panel wall?
- Functional – more than just wood “wallpaper,” a wood panel wall is a chance to integrate display shelving, storage, and other functionality into what might otherwise be a simple plane of painted drywall. The wall can become a piece of cabinetry.
- Beautiful – the most obvious reason to design a wood panel wall is to have another surface of glowing gleaming wood in a project, making it both more eye catching and more tactile.
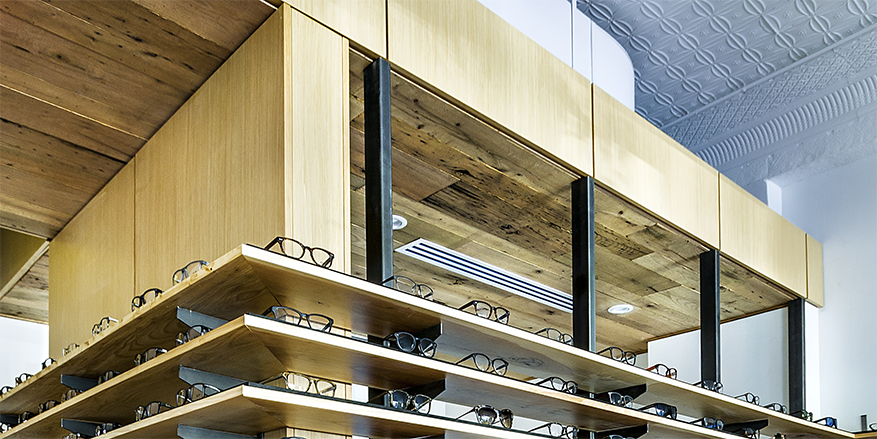
- Durable – they are also a little more resistant to the slings and arrows and hard corners of life than a typical sheet of drywall. Choosing a wood panel wall in a situation like the narrow, high-traffic hallway of Uptown Family Vision makes more scuff resistant, long lasting surface.
- Removable and reusable – and if the next incarnation of this space will be without a wood panel wall, it can easily be removed and repurposed. Unlike a tile wall finish, taking a wood panel wall back off the wall can be accomplished with the covering of a few nail holes. Plus the panel itself is relatively intact for future reuse. This is as true for a retail space, which could be re-allocated to another business, or for a home which could sell to an owner with different tastes. See also: Design for Deconstruction.
With those reasons in mind, lets explore how we are mount a wood panel wall.

As you can see above, the panel wall features several intentional gaps between areas of panel or “reveals.” These reveals occur vertically between panels, at the connection between the wall panel and the ceiling and between the bottom of the panel and the flush mounted base, and show off the construction of the wall (modernism is all about telling the truth about construction).
The panels along the office and exam room hallway are a veneer product – rift sawn white oak – over a backing of sustainably managed fast-growing soft woods. We use a 4″ high piece of solid wood, in the same species, to span along the bottom edge because, in a commercial space we need to plan for regular wet mopping, and regularly getting the bottom edge of a plywood panel wet might eventually result in the layers delaminating. The same base piece helps us account for any irregularity in the floor (common in older buildings like this one), small differences in the height of the base are less noticeable to the eye than a panel with a bottom edge that is not square or is mis-aligned from the adjacent panel.

Our panels are attached to the wall with hook strips, custom cut wood blocking pieces that are attached to wall and panel each with an angled “tooth” that engages with the other half to hang the panel using gravity. This method is also sometimes used to hang upper cabinets. The result (below) is a sleek and simple wood wall panel detail that will stand the test of time.

We’ve recently included the wood wall panel design in the scope of a basement renovation in Roscoe Village (shown in the sketch below). On the left half of the panel wall, wood panels will simply be mounted to a drywall clad and framed wall that separates the bathroom from the main den area.
The right side panels conceal the back of a closet and shelving unit that opens into the den on one side and into a guest room on the other, doing double duty. We have specified ripping standard 4×8 panels down to 2′ widths to add more verticality to a low space.
This perfectly illustrates the power of the panel wall to add functionality with a minimum of fuss. Merely panels on the left side, the right side of the wall displays (and conceals) three book shelves and a full guest closet.

Read more about the entire Uptown Family Vision project here. And here’s a sneak peak that we’re going to have a new wall panel wall design coming soon.


